
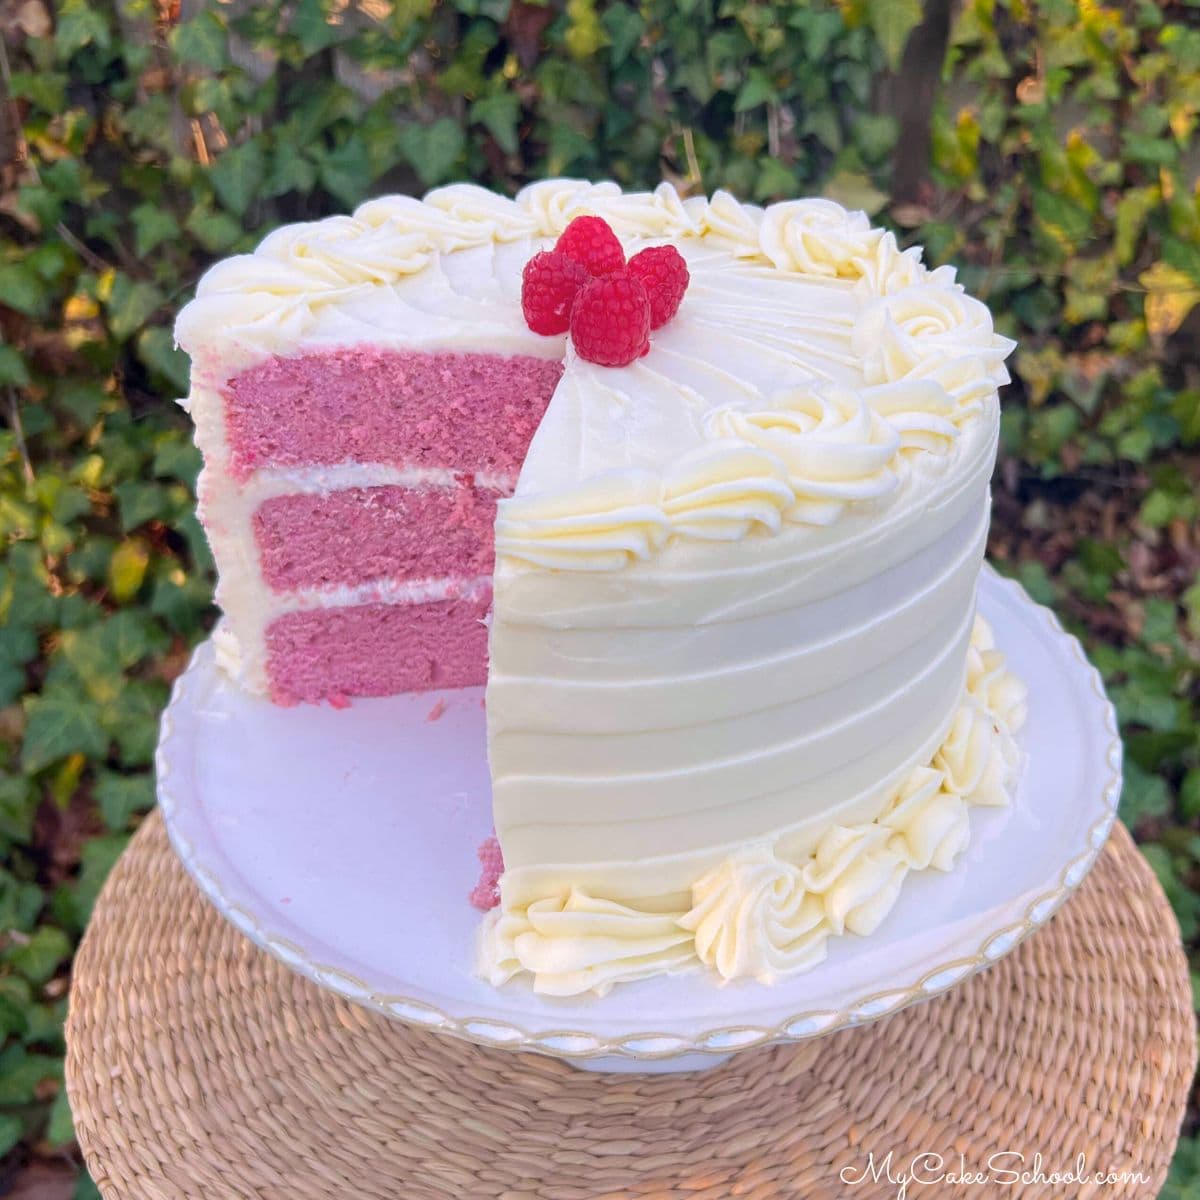
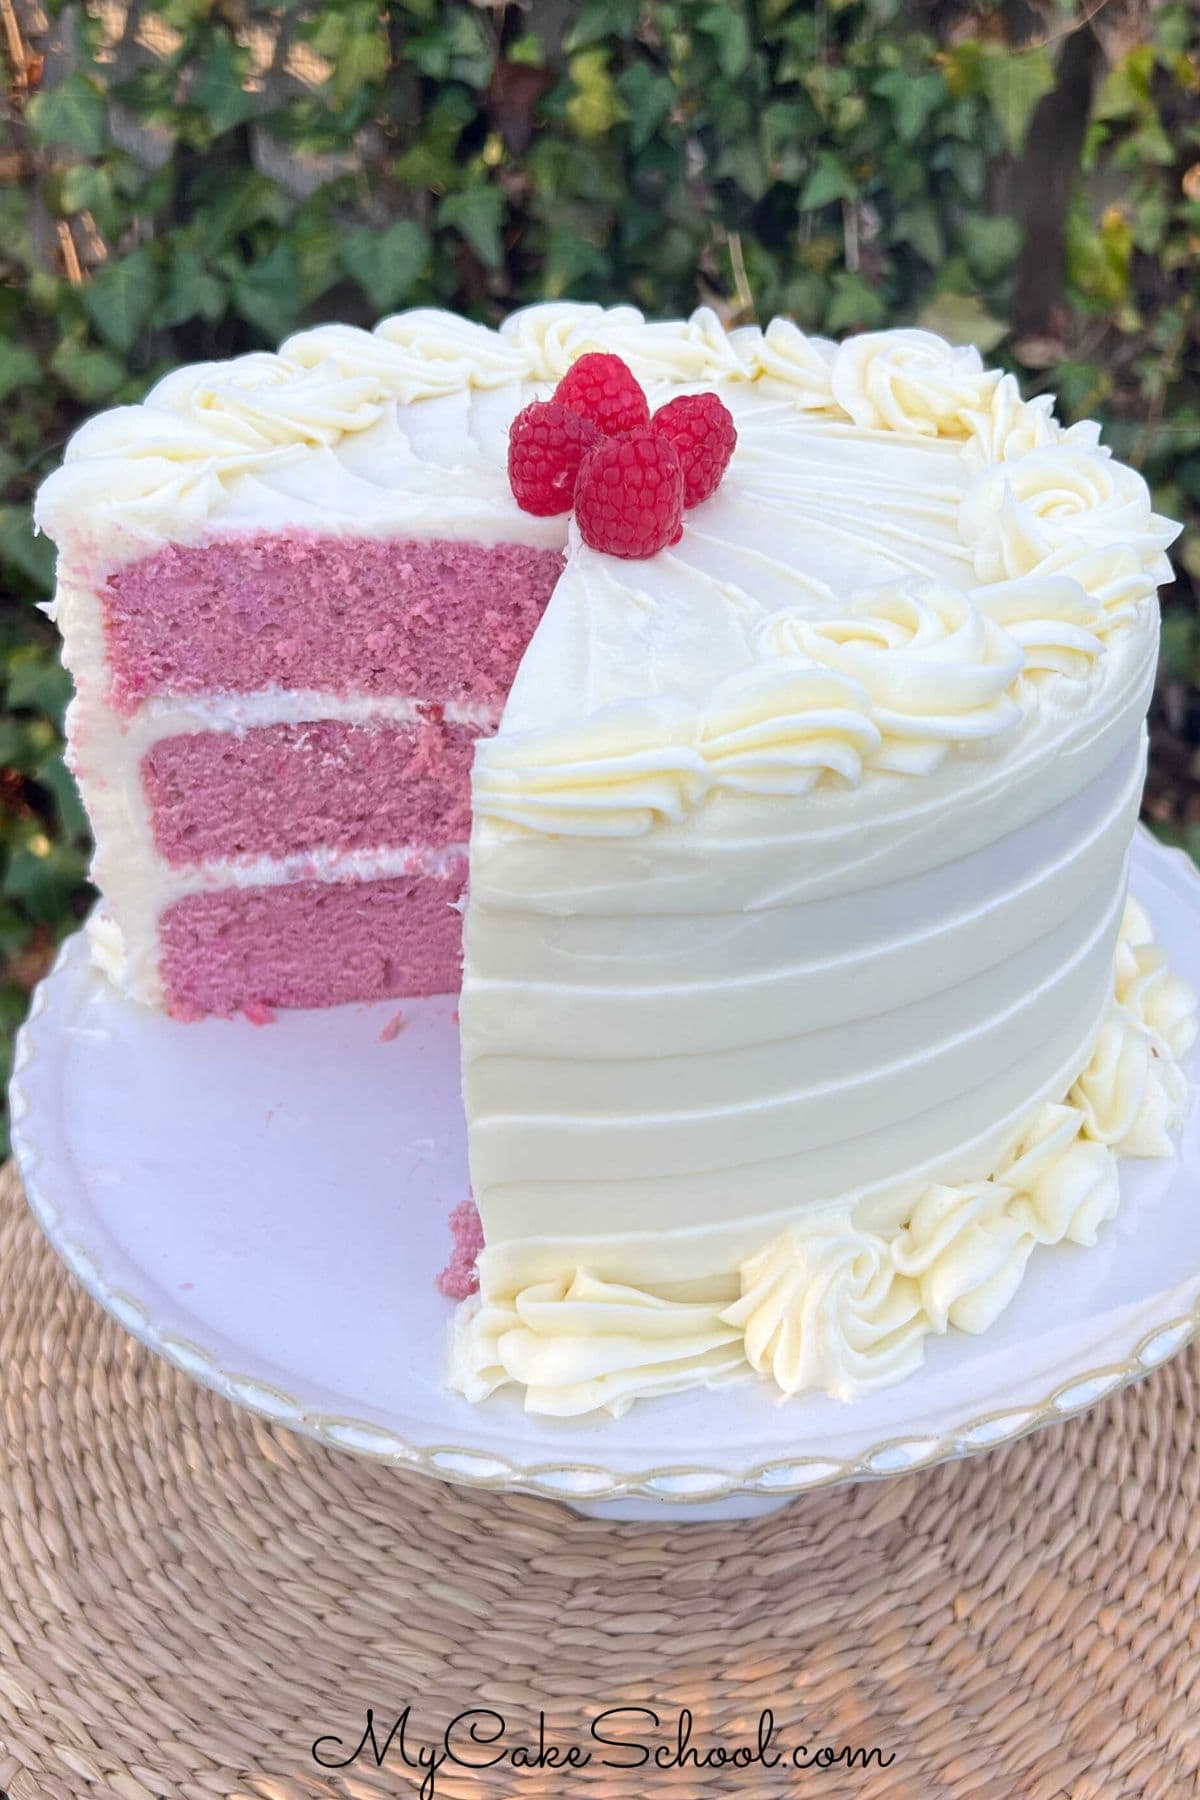
We’re excited to share this moist do-it-yourself Raspberry Velvet Cake with you! Tender Raspberry Velvet layers are stuffed with whipped cream and raspberries, and frosted with cream cheese frosting. That is such a flavorful recipe, and ideal for spring and summer season celebrations.
We have made many “velvet muffins” through the years! These muffins are named for his or her velvety tender texture, and so they typically (on our website no less than) comprise a block of cream cheese as a secret ingredient. It provides richness and a young crumb. A few of our favorites have been white velvet cake, vanilla velvet cake, white chocolate velvet cake, coconut velvet cake, and lemon velvet cake, simply to call a couple of!
Key Substances
Raspberries (we used frozen) which we lowered over warmth
- Unsalted Butter (we add the salt individually)
- Cream Cheese provides richness and creates a tender texture
- Sugar
- Eggs
- Buttermilk‘s acidity makes the crumb additional tender
- Vegetable Oil
- Baking Soda , Baking Powder, and Salt
- Pink/Purple coloring gel (non-compulsory)
*Not included on this record: our whipped cream & raspberries filling, and cream cheese frosting.
Methods to Make Raspberry Velvet Cake
- We advocate making the raspberry discount first because it takes a while (though not tough) and wishes to chill. You would even do that step the evening earlier than and refrigerate.
This step entails mixing the raspberries in a blender, straining the seeds out, and heating the seedless puree in a saucepan to scale back. The profit is that you just get extra taste with out all the additional liquid.
- This cake is much like a lot of our muffins that decision for cream cheese within the batter. After mixing the room temperature butter till clean, we added within the room temperature cream cheese and blended to mix.
- Then, we added within the sugar, mixing for a couple of minutes till lightened and fluffy. **We additionally used a little bit of pink coloring gel to brighten up the batter, you can begin with a small quantity after which enhance if wanted within the subsequent steps.
- We then added in our eggs, one after the other, and alternated between including our dry elements and moist elements. Combine *simply till mixed* so the batter is not over-mixed.
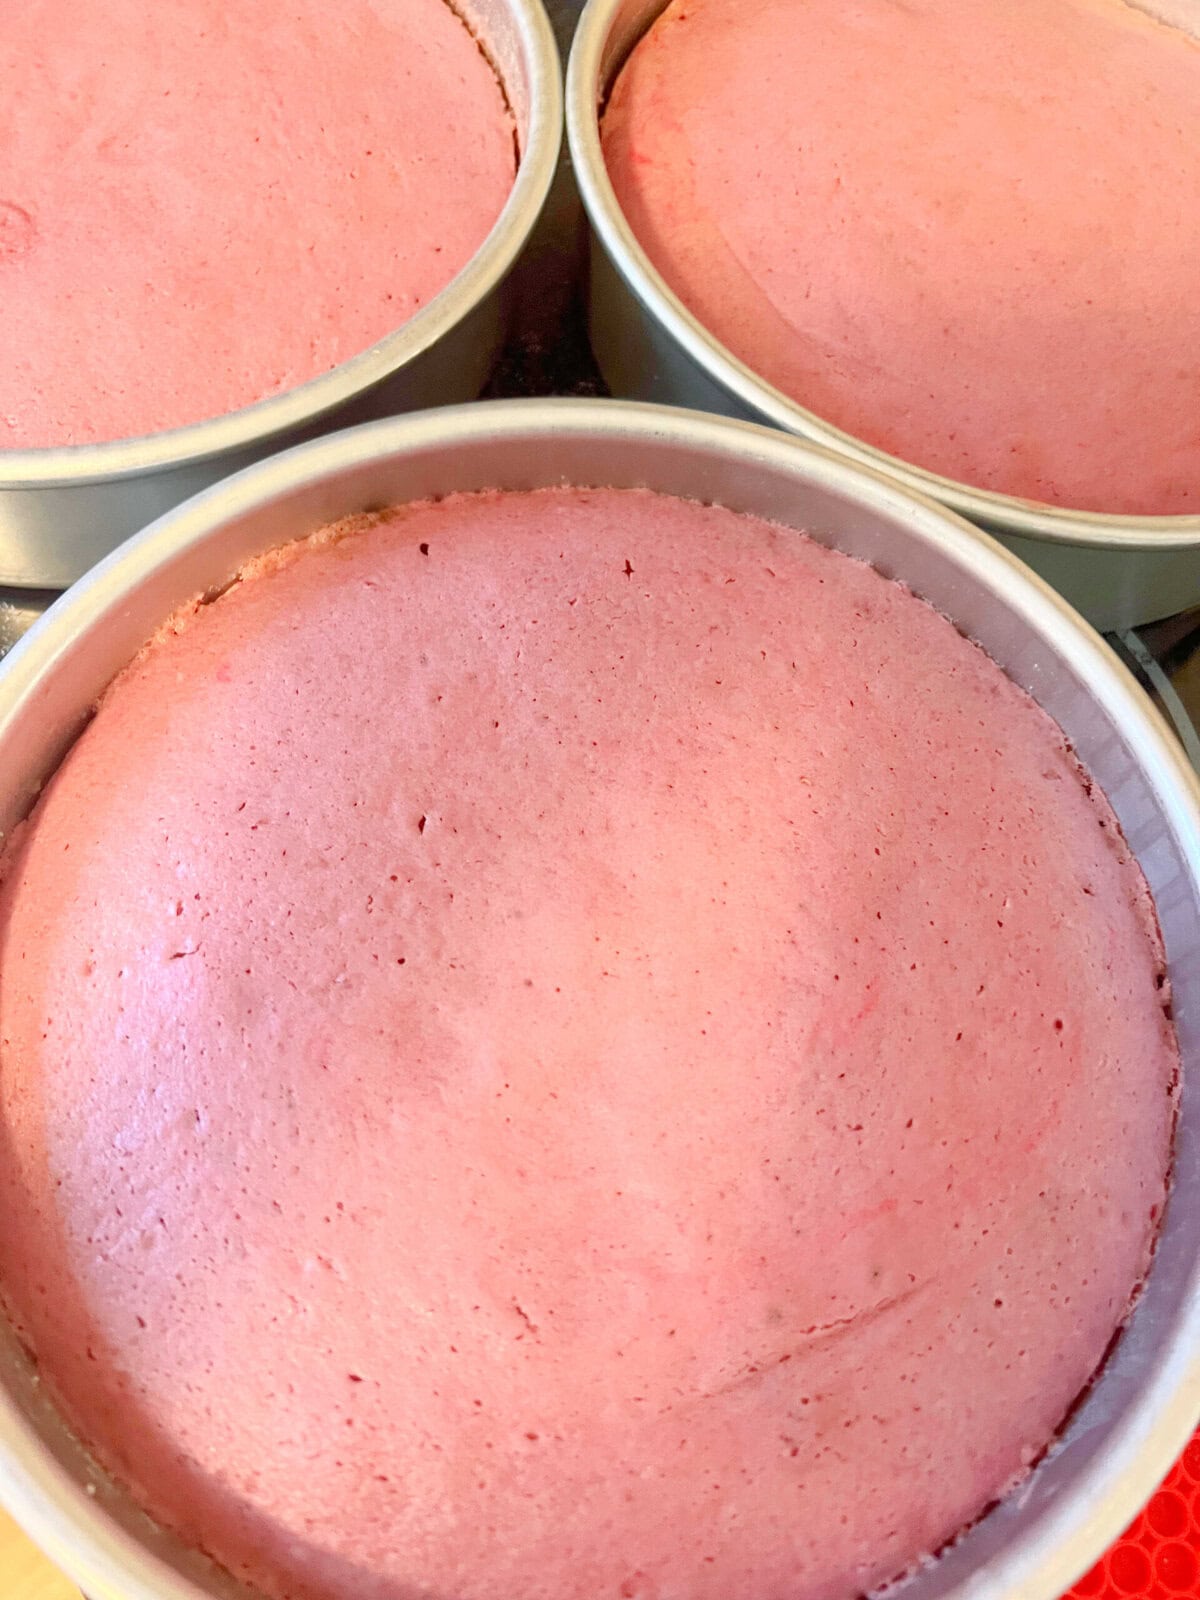
- Bake at 325 F for about 25-28 minutes or till a toothpick comes out clear or with only a few crumbs connected.
Enable the completed cake layers to cool on a cooling rack for five minutes earlier than turning out. Cool the layers utterly earlier than assembling the cake. (You’ll be able to even wrap and freeze the layers for as much as three months!)
Assembling the Raspberry Velvet Cake
There are various fillings & frostings that might be nice with raspberry cake layers, from cream cheese frostings to buttercream frostings, lemon or coconut frostings, and even chocolate or white chocolate frostings.
At this time, we whipped up some easy whipped cream, created a glaze for the cake layers utilizing seedless raspberry jam, and made a fast and scrumptious cream cheese frosting.
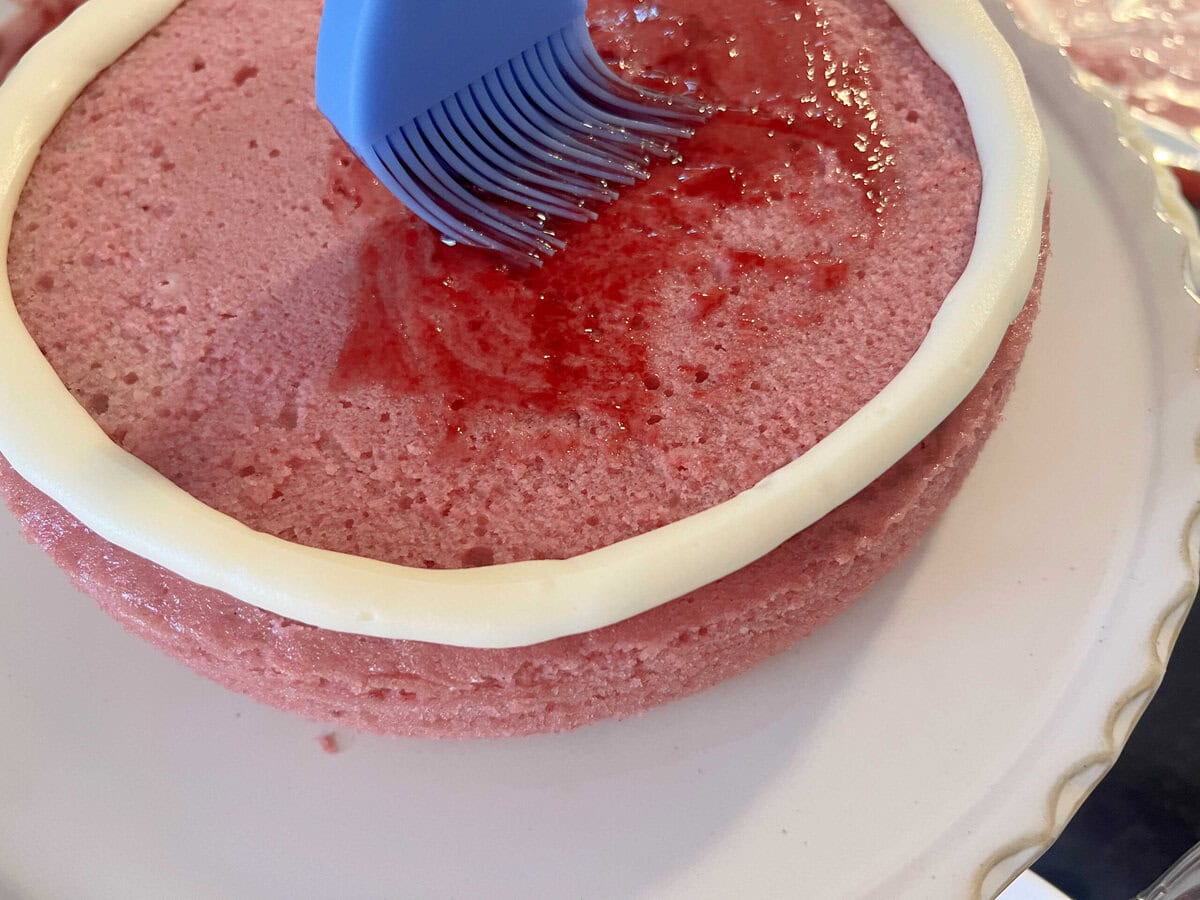
We positioned the primary cooled cake layer on a cake pedestal. Then, we piped a dam utilizing a disposable piping bag with the tip snipped away, about ½ inch from the sting. We brushed on our raspberry jam “glaze” (jam thinned with a little bit of sizzling water), and crammed it with whipped cream and recent raspberries.
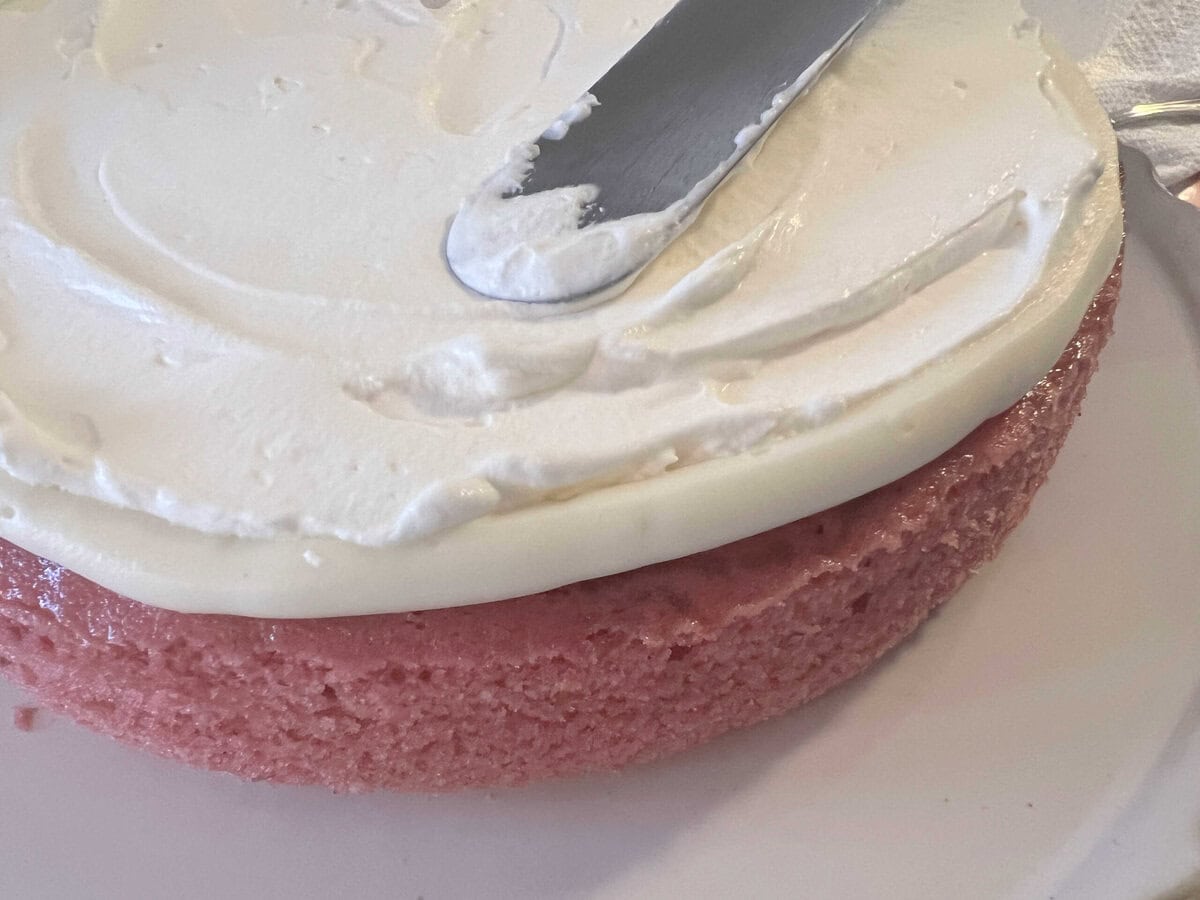
We repeated these steps for the subsequent cake layer, and topped with the last layer. We crammed within the gaps between the layers with extra cream cheese frosting (we like to make use of the identical piping bag that we used for the dam for this step).
Then, we crumb coated the cake with a skinny layer of cream cheese frosting. At this level, it’s a good suggestion to chill the cake for about Quarter-hour within the freezer to agency issues up (or longer within the fridge). This simply makes is less complicated to use the ultimate coat of frosting.
Apply the last coat of frosting with an offset spatula, clean with a bench scraper or spatula, and enhance nevertheless you want!
We used a cake comb to create stripes as we rotated the cake on a turntable. Then, we added a chunky border of shells and rosettes utilizing a 1M piping tip. We topped with a couple of recent raspberries!

Extra Truffles with Raspberries
We’ve made many muffins with raspberries through the years! A few of our favorites are our Raspberry Layer Cake, Almond Raspberry Swirl Cake, Lemon Raspberry Swirl Cake, and White Chocolate Raspberry Cake simply to call a couple of!
Raspberry Discount
-
Use a blender to liquify/puree raspberries (approx 10 oz) to make about 1 ¼ cups puree. You might want so as to add 2-3 Tablespoons water to assist issues alongside. We used frozen raspberries, partially thawed.
-
Place a wonderful mesh strainer over a bowl, and utilizing the again facet of a spoon or a rubber spatula, pour the puree into the strainer and press/stir the puree by it to take away the seeds.) Bear in mind to scrape the opposite facet of the strainer as effectively for any remaining seedless puree.
-
Pour right into a saucepan and warmth over medium warmth. (We additionally added 2 Tablespoons Seedless Raspberry Jam for an additional enhance of raspberry taste & a bit of sweetness-optional).
-
Warmth to a mild simmer (quite than a fast boil), scale back to low-medium as wanted. It’s going to thicken and scale back. Stir often. We’re lowering the puree to ¾ cup. After about Quarter-hour of simmering, it ought to have lowered to shut to ¾ cup, simply pour right into a heat-proof measuring cup to the ¾ cup mark. Whether it is beneath ¾ cup, you possibly can add a bit extra water to complement. Whether it is approach above ¾ cup, simmer a bit longer. **It’s wonderful to do that step the day earlier than if you would like and refrigerate. The aim of lowering is to provide the taste of 10 oz raspberries with out including a lot liquid to the recipe.
For the Cake Layers
-
Preheat the oven to 325 levels F. Grease and flour three 8 inch cake pans. We wish to line the underside of our cake pans with circles of parchment paper. *You would additionally bake this in two 9 inch pans and add a couple of extra minutes to the bake time.
-
Dry Substances: In a medium bowl, whisk the flour, baking powder, baking soda, and salt for 30 seconds and put aside.
-
Moist Substances: In one other bowl or measuring cup, add the buttermilk, vegetable oil, vanilla, and ¾ cup cooled (cool or barely heat), lowered raspberries. Put aside.
-
Within the bowl of your mixer, add the butter and blend on medium pace till clean. Then, add the room temperature cream cheese, mixing till clean.
-
Step by step add the sugar and blend at medium pace for 2-3 minutes, it’ll turn into fluffier. If you would like so as to add pink coloring, you are able to do that at any time. Begin with lower than you assume you may want. You’ll be able to at all times enhance the quantity of coloring gel after including the raspberry combination.
-
Mixing on low pace, add the eggs one after the other, mixing to include after every addition.
-
With the mixer on low pace, alternately add the flour combination and the buttermilk/raspberry combination, starting and ending with the flour combination (We did 3 additions of the dry combination, 2 additions of moist).
-
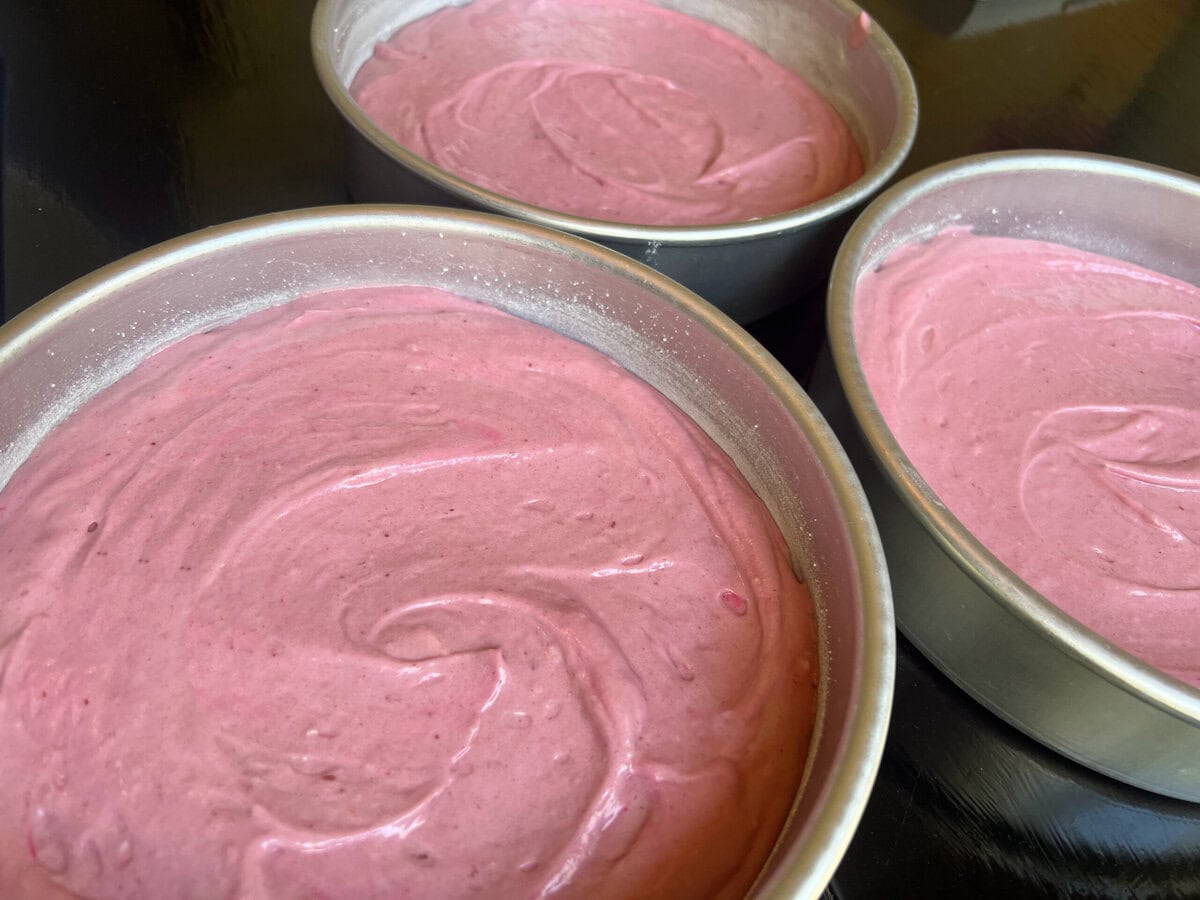
Divide the batter between the three ready 8 inch cake pans.
-
Bake at 325 levels F for 25-28 minutes or till a toothpick inserted into the middle comes out clear or with only a few crumbs connected, alter time as wanted.)
-
As soon as finished, take away from oven and let cool for 5-10 minutes within the pans on a wire rack earlier than turning out.
-
This recipe makes 7 ½ cups of batter.
For the Whipped Cream Filling
-
Chill the blending bowl and beaters/ whisk attachment within the freezer for 10 minutes.
-
Pour the whipping cream, powdered sugar and vanilla extract into the chilled mixing bowl, start beating on low pace regularly rising to medium excessive pace.
-
The cream begins to thicken and stiff peaks form- watch out to not overmix. This occurs pretty shortly! At “stiff peak” stage, peaks type and maintain their form when beaters are lifted. That is when it is prepared.
For the Cream Cheese Frosting
-
Add the softened butter to the bowl of your mixer. Beat on low to medium pace till the butter is clean.
-
Minimize the softened cream cheese into items and add to the butter, together with the salt, mixing at low to medium pace till included. If you’re utilizing a hand mixer you might want to melt the cream cheese a bit extra.
-
Add the vanilla. Step by step add the powdered sugar mixing on low pace till blended.
-
Enhance mixing pace barely, mixing till cream and effectively mixed. Watch out to not overmix.
-
This frosting will pipe greatest if used whereas nonetheless chilled. You may make it prematurely, refrigerate and when prepared to make use of, let it soften barely (don’t microwave) and remix.
Assembling the Cake
-
We calmly glazed our cake layers with seedless raspberry jam. That is non-compulsory. To do that, we positioned a scoop (about ¼ cup) of seedless jam right into a bowl and added about 1 Tablespoon of sizzling water to it to create a glaze. Add a bit extra water if you would like a thinner consistency.
-
Place the primary cooled raspberry velvet cake layer on the cake base or pedestal. Pipe a dam of frosting about ¼ inch from the sting, utilizing a disposable piping bag with the tip snipped away. (If you do not have piping baggage for a dam, you may simply wish to hold the filling about ½ inch away from the sting of the layers).
-
Unfold the raspberry jam/glaze excessive of the layer inside the dam. Then add a layer of whipped cream. High with sliced recent raspberries if you would like. We simply sliced up a couple of berries for this step. Modify the quantity of berries to your liking, or skip them altogether.
-
High with the subsequent cake layer and repeat. Then prime with the final cake layer. Fill in any remaining gaps between layers with frosting.
-
Crumb coat the cake with a skinny layer of frosting. Chill within the freezer for 10-Quarter-hour (or longer within the fridge) to agency issues up. This makes it simpler to frost the cake.
-
Apply second coat of frosting, clean with bench scraper or spatula. Enhance to your liking. I used a cake comb to create stripes across the sides, and used a 1M piping tip to create a prime and backside border. We embellished with a couple of recent berries.
-
The cake needs to be saved within the fridge in an hermetic container or beneath a cake dome, and so forth.
-
***Take away the cake from the fridge 2-3 hours earlier than serving in order that it has loads of time to heat and soften. Truffles containing butter agency up when chilled and they also want time so soften earlier than serving.
Substitution for Buttermilk: To make ¾ cup “buttermilk”, add 1 Tablespoon vinegar or lemon juice to a measuring cup. Add milk to the ¾ cup mark.
Refrigeration: Due to the whipped cream filling, this cake needs to be refrigerated. Take away from the fridge about 2-3 hours earlier than serving in order that it has loads of time to heat to room temperature for greatest texture and taste.